One of the hardest aspects of playing the guitar when you first start out is strumming. A lot of people assume that it has everything to do with getting your strumming hand to become comfortable and fluid, but how you use your fretting hand is equally important. In each example in this lesson, we’ll explore a different one-bar strumming pattern that you can adapt and apply to tunes that you like to play. There are a few things I want you to keep mind while you’re learning and playing these examples:
- Keep your strumming hand very loose
- Always strum with a down and up motion, as if you’re shaking your hand up and down like you’re trying to loosen it up
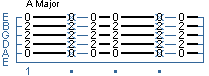
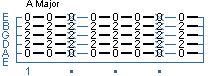
- When you see a muted chord (denoted by notes with an “x” through them), take the pressure off the notes that you are fretting, and strum it. You should hear just a “chuck”, and no notes should ring. If there are open strings, you may need to use one of your non-fretting fingers to block them out. Alternatively, you can just take your hand, lay it lightly across all 6 strings, and strum.
The “chuck” is one of the most important parts of strumming, because this helps you imitate some kind of percussion, along with your regular strums. Try to get comfortable with fretting a particular chord (in this case, an A major chord), then getting your hand in place for the “chuck”, and then getting it back into position to fret the A chord. The faster you can do this with your fretting hand, while keeping your strumming hand moving at the same time, the better your strumming will sound. In the example below, set your loop count to “Forever” and try to strum along. The basic pattern looks like this:
If it’s a struggle, slow down the tempo and re-play it. If it feels good, include just the groove in the playback and play along with just the groove. Try increasing the tempo if everything’s cool.
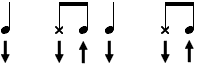
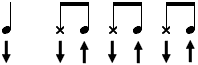
This next pattern is very similar to №1, but we start out with a down and up strum instead of just the one down strum. The basic pattern looks like this:
Set your loop count to “Forever” and try to strum along. If it’s a struggle, slow down the tempo and re-play it. If it feels good, include just the groove in the playback and play along with just the groove. Try increasing the tempo if everything’s cool.
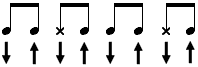
This example is also similar to №1, but we’ve changed the third beat. Instead of a quarter note, we just use the same pattern as in beats 2 and 4. The result is an emphasis on the up strokes on all the beats except the first. The basic pattern looks like this:
Set your loop count to “Forever” and try to strum along. If it’s a struggle, slow down the tempo and re-play it. If it feels good, include just the groove in the playback and play along with just the groove. Try increasing the tempo if everything’s cool.
Hopefully, you’re starting to get the hang of it. So far, all the examples have been one measure patterns. In this next example, we use a two-measure pattern that is a common one. In fact, this is the default strumming pattern for “Fast Rock 1” in the Groove Builder:

Set your loop count to “Forever” and try to strum along. If it’s a struggle, slow down the tempo and re-play it. If it feels good, include just the groove in the playback and play along with just the groove. Try increasing the tempo if everything’s cool.

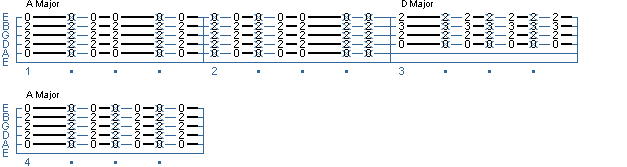
Now let’s put it all together with an A chord and a D chord. We’ll use the strumming pattern from last page in measure 1 and 2, then use the strumming pattern from page 3 when we hit the D in measure 3, and the same pattern in measure 4. Set your loop count to “Forever” and try to strum along. If it’s a struggle, slow down the tempo and re-play it. If it feels good, include just the groove in the playback and play along with just the groove. Try increasing the tempo if everything’s cool.
Well, that’s it for this lesson. Hopefully these examples have been helpful. These are just a few tips on how to put some different elements in your strumming. It’s important to just maintain a nice, easy rhythm and to keep playing songs that have nice chords that you really like. I highly recommend taking one of your favorite songbooks and just strumming through the different tunes using some of the patterns we’ve just covered. You’d be surprised at how much better your strumming sounds in a short amount of time.
You can create more interesting strumming patterns by using hammer-ons after the strum. A hammer-on is when you pick a note, and while it’s ringing, you fret a note that’s higher on that string without picking it. The result is subtle but effective. In the examples in this lesson, we’ll use our standard C, A, G, E, and D open major chords, and we’ll modify one note in each chord with a hammer-on. In these cases, the modified note is always an open string, and then we fret the real note in the chord just after the initial strum.
In the example below, we take our basic C chord and modify the E that’s played on the 4th string. When we strum the chord, the E isn’t there. It’s replaced by the open D string, and we then hammer on at the 2nd fret. The last measure shows how it might sound in a real strumming pattern.
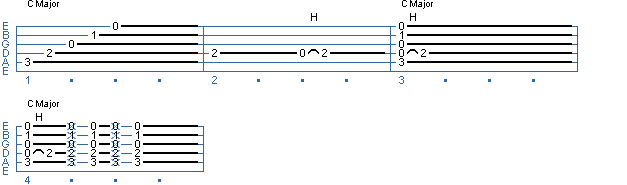
Is this starting to make sense? In general, if the difference between the original played open string and the fret of the hammer-on is 2 frets apart, the hammer will sound good. You might want to try experimenting with hammering other fretted notes in these chords to see how they sound.
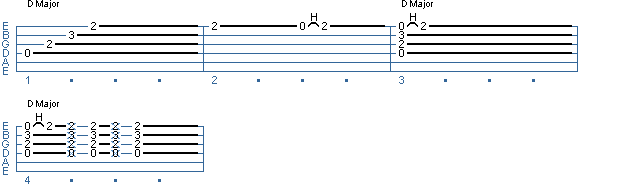
In the example below, we take our basic D chord and modify the F# that’s played on the 1st string. When we strum the chord, the F# isn’t there. It’s replaced by the open E string, and we then hammer on at the 2nd fret. The last measure shows how it might sound in a real strumming pattern.